Blogged with the Flock Browser
Sabtu, 11 September 2010
Rabu, 08 September 2010
Sony shows off Google TV (or a video of it, anyway) at IFA 2010 -- Engadget
It's not the full-on demo you're probably hoping for, but Sony devoted a section of its sprawling, city-within-a-city of a booth at IFA 2010 to
Blogged with the Flock Browser
Browser Choice Means We All Win
For those of us who believe in the importance of freedom of choice, this week is very special. In the past, European PC users were only given Microsoft’s choice of browsers — Internet Explorer. But now, thanks to the European Commission, users can choose their browser from twelve of the top browsers available in Europe. As part of Microsoft’s anti-trust settlement with the Commission, these twelve browsers will be presented to users of the Microsoft Windows operating system. This presentation, referred to as the Browser Choice Screen, was launched this week and will be delivered to 192 Million PCs within 27 European countries over the next 90 days. Flock is thrilled to have been selected as one of the top twelve browsers.
The fact that millions of users can now choose a browser that fits their needs is the good news. Unfortunately, there’s some bad news too. A representative mock-up of the actual window that is now being delivered to PC users in Europe by Microsoft is available for you to see at http://www.browserchoice.eu. Unfortunately, this Choice Screen design leaves most users unaware that there are more than five of the largest browsers to choose from. So it doesn’t achieve the European Commission’s stated objective to provide "information on the 12 most widely-used web browsers and to allow users to easily download and install one or more of these web browsers".
Flock has joined forces with five other browser companies to present an urgent petition to the European Commission so that a simple fix can make all the browser choices readily apparent. Last night, we formally submitted our Petition to the European Commission.
As you can see in the petition, what we’re fighting for on behalf of users is very straightforward. We want them to know about the wide range of choices they have when they select a browser. Whether they need a social browser, such as Flock or any of the other eleven options. We can all agree that everyone deserves the opportunity to make the most informed choice possible.
The European Commission quickly acknowledged our submission, and we are hopeful that we can engage in a dialogue about a simple, quick fix that would help consumers make an informed choice.
Browser choice is important because it encourages innovation. And fixing the current Choice Screen design means Internet users in Europe will have an effective and unbiased ability to select the browser that best meets their needs based on the merits of all 12 browsers, and not only the "Big 5" on the main screen.
Blogged with the Flock Browser
Canon recrafting supertelephoto lens lineup
A major lens overhaul yields two new supertelephoto lenses and two prototypes. The SLR powerhouse clearly wants to keep pro shooters from defecting to Nikon.
Blogged with the Flock Browser
What's hot (and not) about Windows Phone 7
After making Windows Phone 7 her primary mobile operating system for the last month, CNET's Ina Fried reports about what she does and doesn't like about Microsoft's new offering.
Blogged with the Flock Browser
Apple TV isn't 1080p and you shouldn't care
The new Apple TV doesn't support video content with 1080p resolution, but it shouldn't have a major impact on its image quality.
Blogged with the Flock Browser
New Firefox beta offers audio API, menu tweaks
A new audio data API, default hardware acceleration, and a return of some menu options that had been missing in previous betas are the keystones to Firefox 4 beta 5.
Blogged with the Flock Browser
Selasa, 31 Agustus 2010
Browser Choice Means We All Win
For those of us who believe in the importance of freedom of choice, this week is very special. In the past, European PC users were only given Microsoft’s choice of browsers — Internet Explorer. But now, thanks to the European Commission, users can choose their browser from twelve of the top browsers available in Europe. As part of Microsoft’s anti-trust settlement with the Commission, these twelve browsers will be presented to users of the Microsoft Windows operating system. This presentation, referred to as the Browser Choice Screen, was launched this week and will be delivered to 192 Million PCs within 27 European countries over the next 90 days. Flock is thrilled to have been selected as one of the top twelve browsers.
The fact that millions of users can now choose a browser that fits their needs is the good news. Unfortunately, there’s some bad news too. A representative mock-up of the actual window that is now being delivered to PC users in Europe by Microsoft is available for you to see at http://www.browserchoice.eu. Unfortunately, this Choice Screen design leaves most users unaware that there are more than five of the largest browsers to choose from. So it doesn’t achieve the European Commission’s stated objective to provide "information on the 12 most widely-used web browsers and to allow users to easily download and install one or more of these web browsers".
Flock has joined forces with five other browser companies to present an urgent petition to the European Commission so that a simple fix can make all the browser choices readily apparent. Last night, we formally submitted our Petition to the European Commission.
As you can see in the petition, what we’re fighting for on behalf of users is very straightforward. We want them to know about the wide range of choices they have when they select a browser. Whether they need a social browser, such as Flock or any of the other eleven options. We can all agree that everyone deserves the opportunity to make the most informed choice possible.
The European Commission quickly acknowledged our submission, and we are hopeful that we can engage in a dialogue about a simple, quick fix that would help consumers make an informed choice.
Browser choice is important because it encourages innovation. And fixing the current Choice Screen design means Internet users in Europe will have an effective and unbiased ability to select the browser that best meets their needs based on the merits of all 12 browsers, and not only the "Big 5" on the main screen.
Blogged with the Flock Browser
Selasa, 03 Agustus 2010
Surfing the Social Tsunami ...
The Web is fast-becoming the Social Web. More and more users around the world are discovering the powerful benefits of being connected online to friends & family. At Flock, we believe passionately that this global phenomenon is literally bringing the Internet to life. It’s the beginning of a new chapter in the history of the Internet and it is fundamentally changing what we see, think and are able to do.
Because Flock is fully dedicated to enriching the social experience, over the past year, our users on Facebook have grown by 600% to over 7.5 million users. This dedicated and diverse community of Flock users has given us a privileged peek into the future. We’ve listened and learned a lot from our valued community.
With Social becoming a new way for everyone to engage, discover, work and play online, we decided last year that it was time to build a completely new and different version of Flock. Our goal was to redesign Flock to meet the needs of all active social media users, and anyone who seeks to better manage the volume of information, media and relationships they interact with online each day.
I am pleased today to announce the release of an entirely New Flock.
The Social Web Browser that Flock pioneered years ago takes a giant leap forward with today's launch. The New Flock helps you discover the best of the modern Web, easily manage your valued relationships and cut through the clutter online. It keeps you connected with your friends and favorite content in real time, while you surf the web. For example, you can now Group people, topics and information so that you can “channel surf” the Web and switch the Flock Sidebar view so you can see and engage with the conversations and information you find most interesting at any given moment. The new Flock is also the best place to easily search your own personal social network with our new What Your Friends are Saying feature. And, as the first major browser other than Google Chrome to be built on the Chromium platform, the new Flock is blazingly fast!
Check out our press release and animated video to get a full view of all that's exciting about the New Flock. And then, take a test flight in the New Flock and let us know what you think!
Finally, I would like to take take this opportunity to offer a huge shout-out to the incredibly talented team that has worked so hard to build the all New Flock. I can not sufficiently state my appreciation for the talent, dedication and passionate work from: Chris, Mark, Matt, Dick, Dylan, Bruno, Adam, Justin, Kris, Ryan, Leon, Marcus, Randy, Daryl, Bryan, Lyndon, Brian, Cameron, Melody, Matt(2), Joanie, Denise, Julie, Marcy, Geoff… and of course, Clayton. A call out also goes to those who started this with us, and to the casual contributors not listed in this core group, too. This is a great team whose tenacity, intelligence and spirit is what makes everything at Flock possible!
- Shawn Hardin, CEO Flock
Blogged with the Flock Browser
Who is not familiar with google adsense, a program of ads per Clik gogole very profitable. everyone wants to get money from google adsense. In fact to get money from google adsense is quite difficult, because many who have prepared such a website or blog to place ads with google adsense and visitor traffic. Namum for those of you who have minimal knowledge about the blog or the web, but would like to earn money adsense darigoogle, consider the following tips.
Join the Shvoong. Shvoong is a website that will put google adsense ads to anyone who wants to write on Shvoong. You will earn money from google adsense without creating a website or blog. The trick is very easy, just join in http://id.shvoong.com/aff-71501/. and making any articles, because articles which will be paired by the Shvoong iklangoogle adsense. For those who have not signed up, silahlan use the following link.
tips to know the price of ads for specific keywords:
1. go to Google AdWords: Keyword Tool https: / / adwords.google.com / select / KeywordToolExternal
2. then the Enter button one keyword or phrase per line: enter keywords to your research. example ipod phone camera up to you then click "Get Keyword Ideas"
3. will appear more related keywords with "camera phone" and then choose the column to the display section select "Show Estimated Ad Position" / Show who predicted ad position "then click again" Show Estimated AVG CPC / Tamplilan Average BPH.
4. please refer to the maximum ad prices, select currency U.S. Dollar.
and Look at the results.
5. for articles related to that keyword.
The above steps provide the opportunity for you to get $ $ from google adsense.
Affiliate Millionaire is LIVE!
Well after all the waiting we are LIVE
Here’s the direct link
http://affiliatemillionaire.com
Enjoy ![]()
Andrew
Blogged with the Flock Browser
Senin, 02 Agustus 2010
Affiliate Millionaire is LIVE!
Well after all the waiting we are LIVE
Here’s the direct link
http://affiliatemillionaire.com
Enjoy ![]()
Andrew
Blogged with the Flock Browser
Download My Free Report – Has The Internet Marketing Bubble Finally Burst?
Hey everyone,
I’ve written an eye opening report entitled “Has the Internet Marketing Bubble
Finally Burst?”
It’s got some pretty cool stuff inside it.

And guess what..
It’s not part of any fancy product launch – I’ve just written it to
give back to our cool community and try and help everyone out ![]()
Inside it you will discover…
- What is the Product launch slope of death and why it can KILL
your business
- How I generated 500% more commissions NOT promoting on
launch day.
- The FATAL mistakes that will make a JV partner never do business
with you again.
Right click here and select “Save Target As” to download the report now
If you think its cool or want to leave your feedback below that would
be GREAT!
Look forward to hearing your feedback,
Foxy
Blogged with the Flock Browser
Jumat, 30 Juli 2010
Rabu, 28 Juli 2010
Selasa, 27 Juli 2010
Rabu, 21 Juli 2010
Rabu, 14 Juli 2010
Free Website Builder Software - My Take

Hi
In this post I’m going to talk to you about website builders and what I recommend is the best option for you whether you are a newbie or an experienced affiliate marketer.
When choosing a website builder software, you need to consider your current situation.
1. Are you building a landing page?
2. Are you building a content portal?
3. Are you building mini sites?
Those are 3 scenarios that you might find yourself in at any given time in your affiliate marketing career.
In any of these 3 scenarios, I find myself using one or a combination of the following software:
- Wordpress
- Adobe Photoshop
- Dreamweaver
- XSitePro / Netobject
Now let’s explore your the options for each of these 3 scenarios…
Building a landing page:
If you are planning on having a highly graphical landing page that mostly consists of images, then your best bet would be to use Adobe Photoshop to design and slice the landing page and then to use Dreamweaver to make any edits (if needed).
Tutorials on Photoshop website creation and slicing:
1. 35 Tutorials for creating website layouts in Photoshop
2. How to slice a design in Photoshop
I usually get a designer to make me striking graphical landing pages which I use for PPC and other paid traffic sources.
If you are planning on creating a simple non-graphical landing page, then you won’t need Photoshop. You can get away with simply using Dreamweaver.
My personal favorite non-graphical landing page creator is WORDPRESS!
That’s right. With Wordpress I simply activate my AffiliateTheme and I instantly have an awesome looking page that can be used as a review landing page.
Building a content portal:
In the old days - 2000 - I was used to using Dreamweaver to build my “big” websites. Back then I didn’t even know about Wordpress. Can you imagine building and updating a 500 page website with desktop software? It’s a damn nightmare! Not to mention incredible suffering you can experience if your PC crashes. Yes…it happened to me and I quickly found myself gulping down some Jameson.
Wordpress is definitely my #1 choice here. Nothing can come close to the sheer simplicity and user friendliness of Wordpress when it comes to creating huge content portals. If you are planning on creating an authority site, then do yourself a favor….use the best possible solution.
Building a mini site
This is an interesting one. I love mini sites because I can focus on a specific product or niche keyword, build a mini site around it within a few hours and then SEO the hell out of it.
Up until recently I have used XSitePro or Netobjects Fusion for my minisites. Both software have a great ability to build mini sites with a solid framework. While XSitePro is much user friendlier and have cool addons like SEO Analysis of your pages, Netobjects boasts with the ability to build a better hierarchy of your mini site.
As of lately I have moved over to Wordpress. While both XSitePro and Netobjects Fusion served me fantastically, Wordpress have an endless amount of addons, but most importantly…far easier to get indexed due to having it’s own updating RSS feed. Also, it’s far quicker getting a site up and running when working with Wordpress.
There you have it.
Reinhardt
Blogged with the Flock Browser
5 Vital Elements That Increase Your Landing Page Opt-In Rate

“This post comes from the old AffiliateTeachings Blog. This is such a valuable post, I have decided to repost it here. If you are reading this, chances are good this is the first time you are reading this article. Enjoy!”
 In this article I would like to discuss the elements which you can use to increase the opt in rate of you lead capture page.
It’s very easy to increase your opt in rate by just implementing a few of the elements discussed in this article.
There are 5 elements which you can incorporate into your page, lets quickly have a look at them.
1. Personalization elements (personalization elements need to be incorporated everywhere)
- Pictures of you or any human
- Text conveying personal touch
2. Social Proof Elements
- Testimonials from current subscribers
- Pictures featuring websites advertising your website
3. Media Elements
- Video (video featuring you explaining what you have to offer)
- Audio (again, explaining what you have to offer)
- Product screenshots (Include graphics of your product, this can be in the form of 3D boxes etc.)
4. Safety Elements
- Can Spam Act Compliant Statement (You need to state that you will never spam or sell the visitors information)
- Privacy Policy
- Anti Spam Policy
5. Attention Elements
- Catchy Headline that draws the visitor’s attention to what you have to offer (include your major benefit in your headline)
- Bullet Points (Bullet points summarizing what they are going to receive once they opt in.)
- Italic Statements (It’s important to put important facts/benefits in italics)
- The Fold (Keep everything including opt in box above the fold of the page. The fold being the visible part of your webpage once a user loads up your page in their browser)
The 5 elements above are crucial to incorporate on your opt in page otherwise you risk losing several opt ins.
You need to fuse them all together to get the perfect opt in page.
Regards,
Reinhardt
Blogged with the Flock Browser
Free Website Builder Software - My Take
Hi
In this post I’m going to talk to you about website builders and what I recommend is the best option for you whether you are a newbie or an experienced affiliate marketer.
When choosing a website builder software, you need to consider your current situation.
1. Are you building a landing page?
2. Are you building a content portal?
3. Are you building mini sites?
Those are 3 scenarios that you might find yourself in at any given time in your affiliate marketing career.
In any of these 3 scenarios, I find myself using one or a combination of the following software:
- Wordpress
- Adobe Photoshop
- Dreamweaver
- XSitePro / Netobject
Now let’s explore your the options for each of these 3 scenarios…
Building a landing page:
If you are planning on having a highly graphical landing page that mostly consists of images, then your best bet would be to use Adobe Photoshop to design and slice the landing page and then to use Dreamweaver to make any edits (if needed).
Tutorials on Photoshop website creation and slicing:
1. 35 Tutorials for creating website layouts in Photoshop
2. How to slice a design in Photoshop
I usually get a designer to make me striking graphical landing pages which I use for PPC and other paid traffic sources.
If you are planning on creating a simple non-graphical landing page, then you won’t need Photoshop. You can get away with simply using Dreamweaver.
My personal favorite non-graphical landing page creator is WORDPRESS!
That’s right. With Wordpress I simply activate my AffiliateTheme and I instantly have an awesome looking page that can be used as a review landing page.
Building a content portal:
In the old days - 2000 - I was used to using Dreamweaver to build my “big” websites. Back then I didn’t even know about Wordpress. Can you imagine building and updating a 500 page website with desktop software? It’s a damn nightmare! Not to mention incredible suffering you can experience if your PC crashes. Yes…it happened to me and I quickly found myself gulping down some Jameson.
Wordpress is definitely my #1 choice here. Nothing can come close to the sheer simplicity and user friendliness of Wordpress when it comes to creating huge content portals. If you are planning on creating an authority site, then do yourself a favor….use the best possible solution.
Building a mini site
This is an interesting one. I love mini sites because I can focus on a specific product or niche keyword, build a mini site around it within a few hours and then SEO the hell out of it.
Up until recently I have used XSitePro or Netobjects Fusion for my minisites. Both software have a great ability to build mini sites with a solid framework. While XSitePro is much user friendlier and have cool addons like SEO Analysis of your pages, Netobjects boasts with the ability to build a better hierarchy of your mini site.
As of lately I have moved over to Wordpress. While both XSitePro and Netobjects Fusion served me fantastically, Wordpress have an endless amount of addons, but most importantly…far easier to get indexed due to having it’s own updating RSS feed. Also, it’s far quicker getting a site up and running when working with Wordpress.
There you have it.
Reinhardt
Blogged with the Flock Browser
How To Use Online Video: Get The Word Out!

I love making videos because they allow me to get content to the reader faster and in a more entertaining manner. The problem is that it takes a bit of effort to create a professional video and with that being said…it’s important that enough people SEE it as soon as possible! Don’t you agree?
Most newcomers to blogging have adopted video as their communication channel on their blogs.
You also get folks who have dedicated all their time to build a Youtube channel.
Did you know there is a way to multiply the effects of your efforts with only a few clicks of a button?
Introducing Tubemogul

TubeMogul
Tubemogul is an online video distribution service that allows you to upload and publish your video to an incredible 29 video sharing sites! - and it’s FREE.
While Youtube is the biggest of the bunch, it certainly is not the only hotspot for videos online.
In addition to publishing your video to a mass amount of sites, Tubemogul is able to track your video views with the aid of Flash and provide you with readable stats.
Watch this video for a demo presentation of what TubeMogul can do:
Tubemogul creates the opportunity for you to get MORE traffic to any website FASTER.
I have personally used Tubemogul for almost every single video I have ever published and the results speak for themselves. This website’s Alexa ranking went from around 450000 to a close 100000 in something like 2-3 weeks and it didn’t take a lot of effort.
I even use Tubemogul as part of my personal linking strategy discussed in my AT Total Dominator Course (if you like being in the Top 3 on Google for competitive terms…check it out - it works)
Tubemogul is one of my secret weapons. I suggest you start using it asap!
Regards
Reinhardt
P.S - Know of any other video distribution sites? Mention them here!
Blogged with the Flock Browser
How To Find Profitable Keywords In Minutes!

Hi again
In the video below I go into a keyword research process that allows you to spot profitable keywords before you ever start a campaign.
You can use this process for almost any niche!

If you are a CPA Storm or Gallo Affiliate System customer, you can use this research process to find out whether the products or niches you are attackings are going to be worth it! That will allow you to reap maximum benefit from any affiliate campaign you take on.
Remember to cross check the ads.
Don’t just look at them, make notes. I use Excel to put the “old” ads in one column and the “new” ads in the next column. That way I can easily highlight which ones are still in play. THOSE are the ones you want to check out.
Some things to check for when you find a winner:
- The specific ad they are using
- The keyword they are targeting
- The layout of their landing page
- The EXACT product/products they are promoting (this is the most important one!)
- any other marketing tactics they might be using
You then have 2 options after finding and analyzing the winner:
1. You can model their campaign to your own
2. You can create a CPA storm or Gallo System site and rank it in Google - making sure you pushing the same products they are. Remember…those products have been making them a profit for over 30 days.
Enjoy!
Reinhardt Gallowitz
Blogged with the Flock Browser
Cloak Your Affiliate Links - Avoid a Google Slap!

Over the past few weeks I have been making contact with old customers of my products.
It came to a big surprise that none of my customers are cloaking their affiliate links on their CPA Storm websites.
If you are new to the term “link cloaking”, let me quickly explain to you what it is.
Let me use Clickbank as an example.
Let’s say you are an affiliate Micro Niche Finder in the Clickbank marketplace.
My raw affiliate link will look something like this:
http://0c7389b9wlo05s54txq35m2l72.hop.clickbank.net/?tid=MNF
The cloaked affiliate link will look something like this:
http://www.affiliateteachings.com/goto/micronichefinder.html
AffiliateTeachings is already a very established portal so I don’t mind throwing a bare affiliate link in here.
But I almost NEVER EVER create affiliate sites with bare links in them.
Why?
Google is slapping thin affiliate sites!
Google is slapping sites who’s majority outgoing links are affiliate links!
Google simply doesn’t like affiliate sites…
So with the help of the free AT link cloaker here on the site, you can also easily cloak your affiliate links!
The link cloak above is a html cloaked link. It’s not just a normal link cloak though. The AT link cloaker also fights of virus programs that might hijack your affiliate links!
You simply log into AT and then you’ll be able to access the cloaker. Simply follow the instructions on the html cloaker and you’ll be up and running in no time!
Enjoy!
Reinhardt
Blogged with the Flock Browser
All Your Affiliate Offers In ONE Place!

Sometimes you simply cannot find a good enough product offer in your affiliate network for a specific niche. Or you see your competitors promoting something that your network doesn’t offer.
Introducing OFFER VAULT

OfferVault stores a HUGE database of affiliate networks and they make it easy for you to search through the massive archive with their easy to use search feature.
The search feature brings back comparable results so you can cross check offers from the various networks.
There are some pro’s and con’s to using OfferVault.
Pros:
1. Centralization of data
2. Easy to use interface
3. Accurate information
4. Keyword and competition data!
Cons:
1. Some high profile offers are not yet available.
I suggest you get over to OfferVault and create an account ASAP.
Cheers
Reinhardt
Blogged with the Flock Browser
15 Wordpress Plugins Every Affiliate Should Use.

In this post I have compiled a list of plugins that I think every affiliate should consider for implementation on their blogs. Hopefully you will go and install these plugins and see the benefits they have to offer. I personally use all these plugins on several of my blogs.
The All in One SEO Pack is a brilliant plugin. Downloaded by over 4 Million people, this plugin is probably the best SEO suite you can find, and it’s FREE. If you want to properly optimize your blog for the search engines, then you need to install this plugin asap.
2. Google XML Sitemaps
This is another fantastic plugin that will allow your blog and all it’s content to be fully crawled by bots.
This plugin will generate a special XML sitemap which will help search engines like Google, Bing, Yahoo and Ask.com to better index your blog.
3. Affiliate Link
If you are sick and tired of uploading redirect files to your server, or adding lines of code to your .htaccess file, then you will LOVE this plugin.
Shrink, track and share any URL on the Internet from your WordPress website. You can now shorten links using your own domain name. The plugin also tracks each hit on your URL and provides a full, detailed report of where the hit came from.
4. Wordpress Link Cloak
Even though this is a commercial plugin, it’s a LIFE SAVER as well as a money generating machine.
This plugin allows you to link keywords to affiliate links in your content across your blog . This means that if you constantly link to a service or product from your posts, this plugin can save you the hassle by doing it all at a few clicks of a button.
5. Psychic Search
I just love this plugin. You know that little search box on all Wordpress blogs? Yup, you will be surprised how many times people search for stuff using your search feature!! Psychic Search saves that data and tells you what people are looking for on your site! That’s some powerful stuff.
6. RSS Auto Submit
This is a bloody good time saver. Even though the author’s site is “black hat”, this free plugin is pretty whitehat and safe. RSS Auto Submit submits your RSS feed to 16 RSS directories and if you know anything about getting indexed, traffic and getting backlinks, you’ll know that submitting to 16 RSS directories on autopilot is pretty darn awesome.
7. Mediacaster
In today’s world you HAVE to go where technology takes you. That means your blog has to include audio, video and any other media that appeals to today’s readers. Mediacaster is not a free plugin, but it’s a darn good investment and will be something you will use for pretty much the rest of your blogging/affiliate life.
Mediacaster takes over the normal Media manager in WordPress, and allows to seamlessly insert Audio, Video and non-image files on your site.
Supported media formats include: .mp3, .m4a, .aac, .flv, .f4v, .f4b, .mp4, .m4v, .mov, .3pg and .3p2. Other file types are treated as downloads. YouTube videos and play lists are also supported.
8. Star Rating for Reviews
How many times have you wished you can post those little stars at the bottom of a product review?
If you are an affiliate who does regular pre sells, my gut tells me you will love this.
Star Rating for Reviews is a simple WordPress plugin that inserts pretty rating stars based on the score you assign using intuitive, inline [rating:] tags. It can also calculate and output overall ratings for you based on all previous scores you have assigned, useful for reviews that have multiple categories or an album review where each track is assigned a score.
9. WP-Banner Plugin
WP Banner Admin allows you to manage various banner ads from different affiliate programs. With the banner plugin you can manage: different banners from one affiliate program, different banners from different affiliate programs and your own banner campaigns limited by date or page impressions.
This plugin also has the ability to rotate banners which is pretty good if your blog has lots of traffic.
10. Sociable
This plugin is a MUST-HAVE. We live in the age of information sharing and web 2.0.
People regularly bookmark and share information and sociable makes it very easy for them to do so.
With sociable you can automatically add links to your favorite social bookmarking sites on your posts, pages and in your RSS feed. You can choose from 99 different social bookmarking sites.
11. Exclude Pages
Every blog needs this because the default code in themes do not allow us to exclude certain pages from our navigation menu. I have blogs with dozens of PAGES. Without this plugin, my navigation bar at the top of my blog would have looked like a crippled pyramid.
This plugin adds a checkbox, “include this page in menus”, which is checked by default. If you uncheck it, the page will not appear in any listings of pages (which includes, and is usually limited to, your page navigation menus).
12. Advertising Manager
If you are not into displaying your own banners on your blog, you can try Advertising manager!
This plugin will manage and rotate your Google Adsense and other ads on your Wordpress blog. It automatically recognises many ad networks including Google Adsense, AdBrite, Adify, AdGridWork, Adpinion, Adroll, Chitika, Commission Junction, CrispAds, OpenX, ShoppingAds, Yahoo!PN, and WidgetBucks.
13. Amazon Reloaded
I just love Amazon. Their products convert into cash much easier than pretty much any other website.
This plugin makes it easy for post authors to quickly search Amazon’s index from their WordPress post interface and grab text links or images to place in their posts.
14. Popshops for Wordpress
Are you a Popshops user? Me too. I just love datafeed driven sites. The wordpress Popshops plugin makes this super easy to accomplish! This plugin is in beta, but seems to work pretty well.
15. Ultimate Google Analytics
If you are an experienced affiliate, you know that tracking your traffic is VITAL to online success.
Knowing where that traffic comes from is seriously important. Not knowing is like trying to build a puzzle in the dark. It doesn’t matter what your skill level, you need to incorporate Google Analytics into your marketing efforts.
It allows you to add Google Analytics JavaScript to each page on your weblog without making any changes to your template. The plugin can also add tracking to outbound links, downloads from your own site and mailto: links.
To your success,
Reinhardt
Blogged with the Flock Browser
Jumat, 09 Juli 2010
Cara Mengatasi Galat bX-rg6px pada Template Blog
Ada pertanyaan yang masuk ke email mengenai galat. Kita sebut saja Mr.X, karena beliau tidak ingin disebutkan nama dan blog nya karena alasan privacy.
Galat yang menimpa template Mr.X adalah galat dengan kode galat bX-rg6px.
Bila anda terkena galat ini anda tidak bisa menambah gadget ataupun mengedit widget pada template anda. Karena galat ini akan memblokir menu Rancangan atau Design pada template blog anda.
mmmmm...serem juga ya... :D
Tapi jangan kwatir, karena M.A punya tips cara mengatasi galat ini.
Setelah M.A searching ke google, ternyata bukan jawaban dari masalah yang M.A dapatkan melainkan banyak nya blogger yang mengalami masalah serupa terkena galat bX-rg6px dan belum ada pemecahan masalah nya.
Galat terkadang muncul pada blog kita karena ada nya kesalahan dari kita pribadi maupun kesalahan system di blogger yang mendeteksi kode/script yang kita pasang pada template di deteksi sebagai galat walaupun sebenar nya kita sudah merasa benar dan tidak melakukan kesalahan.
Galat terkadang muncul dan terkadang bisa hilang dengan sendiri nya dan ada juga beberapa galat yang bisa di pulihkan dengan menghapus cookies. Pada browser Mozilla Firefox seperti galat bX-4h0tgg ini bisa dihilangkan dengan menghapus cookies. Tapi tidak dengan galat bX-rg6px.
Lalu bagaimana cara memulihkan template yang terkena galat bX-rg6px???
Setelah mendapatkan izin untuk mengakses langsung template blog Mr.X, akhir nya M.A masuk ketemplate Mr.X dan ternyata memang benar galat ini memblokir menu Rancangan atau Design, sehingga anda pun tidak dapat menambah gadget.
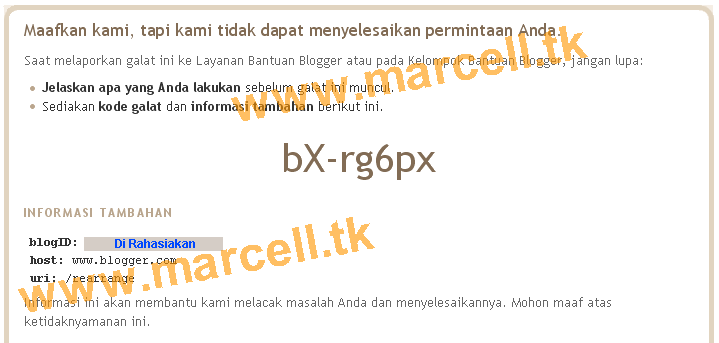
Informasi yang muncul seperti gambar dibawah ini

Sehingga muncul informasi galat seperti gambar dibawah ini:
Cara mengatasi nya cukup dengan mendelete link yang terdapat pada template anda yang diduga sebagai galat dan jangan menghapus link artikel anda. Karena yang bermasalah adalah link yang berada di dalam template dan bukan link dalam artikel anda.
Cara nya:
1. Akses Blogger anda di www.blogger.com
2. Pada Dasbor klik Rancangan atau Design
3. Klik Edit HTML
4. Cari link yang bermasalah tersebut yang diduga sebagai galat. Lalu hapus link tersebut
5. Klik Simpan Template
Bila setelah melakukan cara diatas muncul galat dari link lainnya, maka hapus kembali link yang dideteksi sebagai galat sampai template kita bebas dari galat.
Selain Galat diatas, masih terdapat galat lainnya yang bisa menyerang blog anda seperti: bX-81nuwv, bX-5eka1d, bX-59cppw, bX-v49cve, bX-59cppw, bX-193ra1, bX-f3ec2g, bX-4un7qp, bX-l6y4ub, bX-xykw2l, bX-q0tcxb, bX-4igpf1, bX-u01hr1 dan masih banyak galat yang lainnya.
Semoga informasi cara mengatasi Galat diatas bisa berguna bagi anda semua, khususnya bagi anda yang template nya sedang bermasalah terkena galat bX-rg6px
Ada pertanyaan yang masuk ke email mengenai galat. Kita sebut saja Mr.X, karena beliau tidak ingin disebutkan nama dan blog nya karena alasan privacy.
Galat yang menimpa template Mr.X adalah galat dengan kode galat bX-rg6px.
Bila anda terkena galat ini anda tidak bisa menambah gadget ataupun mengedit widget pada template anda. Karena galat ini akan memblokir menu Rancangan atau Design pada template blog anda.
mmmmm...serem juga ya... :D
Tapi jangan kwatir, karena M.A punya tips cara mengatasi galat ini.
Setelah M.A searching ke google, ternyata bukan jawaban dari masalah yang M.A dapatkan melainkan banyak nya blogger yang mengalami masalah serupa terkena galat bX-rg6px dan belum ada pemecahan masalah nya.
Galat terkadang muncul pada blog kita karena ada nya kesalahan dari kita pribadi maupun kesalahan system di blogger yang mendeteksi kode/script yang kita pasang pada template di deteksi sebagai galat walaupun sebenar nya kita sudah merasa benar dan tidak melakukan kesalahan.
Galat terkadang muncul dan terkadang bisa hilang dengan sendiri nya dan ada juga beberapa galat yang bisa di pulihkan dengan menghapus cookies. Pada browser Mozilla Firefox seperti galat bX-4h0tgg ini bisa dihilangkan dengan menghapus cookies. Tapi tidak dengan galat bX-rg6px.
Lalu bagaimana cara memulihkan template yang terkena galat bX-rg6px???
Setelah mendapatkan izin untuk mengakses langsung template blog Mr.X, akhir nya M.A masuk ketemplate Mr.X dan ternyata memang benar galat ini memblokir menu Rancangan atau Design, sehingga anda pun tidak dapat menambah gadget.
Informasi yang muncul seperti gambar dibawah ini
maaf link di rahasiakan
Galat bX-rg6px ini muncul karena blogger mendeteksi link yang berada di template dideteksi sebagai galat, walau sebenar nya itu hanya sekedar link yang dideteksi sebagai galat, tetapi bisa membuat template anda tidak bisa diakses.Sehingga muncul informasi galat seperti gambar dibawah ini:
Cara mengatasi nya cukup dengan mendelete link yang terdapat pada template anda yang diduga sebagai galat dan jangan menghapus link artikel anda. Karena yang bermasalah adalah link yang berada di dalam template dan bukan link dalam artikel anda.
Cara nya:
1. Akses Blogger anda di www.blogger.com
2. Pada Dasbor klik Rancangan atau Design
3. Klik Edit HTML
4. Cari link yang bermasalah tersebut yang diduga sebagai galat. Lalu hapus link tersebut
5. Klik Simpan Template
Bila setelah melakukan cara diatas muncul galat dari link lainnya, maka hapus kembali link yang dideteksi sebagai galat sampai template kita bebas dari galat.
Selain Galat diatas, masih terdapat galat lainnya yang bisa menyerang blog anda seperti: bX-81nuwv, bX-5eka1d, bX-59cppw, bX-v49cve, bX-59cppw, bX-193ra1, bX-f3ec2g, bX-4un7qp, bX-l6y4ub, bX-xykw2l, bX-q0tcxb, bX-4igpf1, bX-u01hr1 dan masih banyak galat yang lainnya.
Semoga informasi cara mengatasi Galat diatas bisa berguna bagi anda semua, khususnya bagi anda yang template nya sedang bermasalah terkena galat bX-rg6px
Artikel ini di copy dari Marcellino. Silakan Copy Artikel ini dan posting pada blog anda dengan menyertakan link sumber nya.
Kamis, 08 Juli 2010
Site Manager
From FileZilla Wiki
[edit] FileZilla Site Manager
The Site Manager allows FileZilla client users to store information about their FTP sites.[edit] Starting Site Manager
The Site Manager command is located under the File sub menu. You can also press CTRL+s[edit] Site Manager Dialog
Use the Select Entry panel on the left to select the target site. Once a site is selected, you may do the following with it :- Connect to,
- Edit,
- Copy,
- Rename, or
- Delete.
In the right panel, you have 4 tabs to enter a few needed and many optional information about the selected site on the left. They are the following:
- GENERAL tab : Here, you may enter :
- the hostname : Example: ftp.ifyouliked.com
- the Port number : only if it differs from the standards
- the type of FTP server you will connect to (such as FTP or SFTP),
- the type of login that will take place, when appropriate. The options are:
- Anonymous: You can't enter a username and password. In this case the username always is anonymous.
- Normal: You have to enter a username and if required, a password.
- Ask for password: FileZilla asks you the password during logon and it remembers the password during the session.
- Interactive: FileZilla asks for the password ... and asks again for every new connection to the server.
- Account: Selecting this enables the "Account" field in the bookmark's settings. This account type is for FTP only, SFTP does not have support for it.
- the user ID to use when connecting,
- the password required : optional
- the account information needed : optional
- comments about the site : optional
- ADVANCED tab: Here you may enter :
- Servertype : allows you to make a special selection for this FTP target. Most sites will work fine with the Default value, however some will require SFTP.
- Bypass proxy : Allows to bypass any proxy server.
- Default local directory field : Allows you to specify a starting local folder when activating a connection. Example: D:\sites\site1
- Default remote directory : Allows you to specify a starting remote sub-folder when activating a connection. Begin it with a / and add only the path that follows the root ftp directory. Example: /public_html
- Time Zone Settings : Allows to interpret time zone values for the FTP server different from its real settings. See the server timezone offset page for more information.
- TRANSFER SETTINGS tab: Specifies in more detail how transfer may take place.
- CHARSET tab : Specifies the character set used to communicate with the targeted FTP site.
Views
Personal tools


- This page was last modified on 15 May 2010, at 16:16.
- This page has been accessed 83,461 times.
- Content is available under GNU Free Documentation License 1.2.
- Privacy policy
- About FileZilla Wiki
- Disclaimers
FileZila Client Setting
Using
From FileZilla Wiki
Contents[hide] |
Quick Guide
This guide gives you a short overview on how to use FileZilla. By default you don't have to configure FileZilla, so you can start directly working with the program.Connecting to an FTP server
Using the Quick Connect bar
To connect to an FTP server, enter the address of the server into the host field of the Quickconnect bar (i.e. domain.com - see image below). If it is a special server type like an SFTP server, add the protocol in front of the address. In case of an SFTP server, start the address with 'sftp://' (i.e. sftp://domain.com). Enter the port of the server into the port field if it is not the default port (21 for FTP, 22 for SFTP). If a username / password is required, enter it in the corresponding fields, otherwise the default anonymous logon will be used. Click on Quickconnect or press Enter to connect to the server.
Please notice that the Quick Connect is for... quick connections - so there is no way to edit the quick connections list which stores the last 10 entries. To store FTP server names you should use the Site Manager, instead.
Quick Connect is good for testing the login info before making a site manager entry. Once you connect, you can choose File -> "Copy current connection to Site Manager..." to make a permanent entry. It is usually best to check your login info with Quick Connect before making a permanent entry.
Using Site Manager
You can use the FileZilla Site Manager to specify specific site parameters and connect to the targeted FTP site. The Site Manager allows you to store entries and configure more parameters than the Quick Connect allows.Special case: Servers in LAN
If the server you are connecting to is in your home LAN, then there is not an address (domain name) as you may know from the Internet. In LAN, you simply use the internal IP address of the server PC. In most cases the network name (computer name) will do, too. If the server is on the same PC as Filezilla, you can even use localhost or 127.0.0.1 as hostname.NOTE: If you connect from the outside of your LAN this does not apply, you have to use the external (WAN) IP instead.
Navigating on the server
After a successful connection attempt, a list of files and folders appears on the right side of the main window. The current folder is listed in the edit field on the top. Below you will see the remote directory tree and below that, the contents of the current remote folder. There are three ways to change the folder. First, you can double-click a folder in the file list. Second, you can change the current folder by clicking a folder in the directory tree. Last but not least, you can always enter the folder name into the edit field and press enter. You will notice a folder called ".." displayed in virtually all directories. This folder allows you to go up to the parent directory of the current folder.
Navigating on your machine
Navigating on your machine works almost like navigating on the server. The current local folder and the local directory tree are displayed on the left side of the main window by default.
Synchronized Browsing
If you have an identical directory structure on the local machine and the server, you can enable synchronized browsing. This means that any directory navigation on one machine is duplicated on the other.To enable synchronized browsing, create an entry in the Site Manager, and on the Advanced tab, ensure that the Default local directory and the Default remote directory have the same structure. Then check "use synchronized browsing," save your settings, and connect.
Directory Comparison
To quickly see differences between files on the local machine and the server, choose View > Directory Comparison, and choose either "compare file size" or "compare modification time." (You also hide identical files by checking that option.) Then choose "Enable."You will now see color-coded differences between copies of the same file on the different machines. See their meanings here.
Transferring files
You can upload or download a file by double-clicking on it. It will be added to the transfer queue and the transfer starts automatically. To transfer folders and/or multiple files, select them and right-click the selection. Then you can click on Upload/Download in the popup menu.
You can also drag the files from one side and drop them on the other side. To add files to the queue so that they will be transferred later, select them and click Add to Queue from the popup menu. You may also drag the files directly into the queue. Click on the
Or, you can click on a file, then drag the file (a box is added to the arrow cursor) to the folder where you want to move it. The folder will be highlighted when you are over it. Let go of the mouse button and the file will be moved to the folder.

Detailed Information Pages
Detailed information on other aspects of the FileZilla client can be found on the following pages:File Transfer Notes
FileZilla uses multiple FTP sessions. One session gets used purely to browse the server. The other sessions get used to do the file transfers. That way, you can always browse the server even during transfers.For example, here is a simple car analogy: You order a pizza using your telephone (aka the browsing connection), then you hang up the telephone. Then the delivery man drives the pizza in his car to your location (the transfer connection). While the pizza is transferring, you can phone somebody else, like for example your garage because your own car is broken ;)
Reducing simultaneous connections for incorrectly configured servers
If you get a 421 Too many connections from this IP (The preferred solution would be to contact the server administrator and encourage him/her to configure the server correctly (FTP uses more than one connection by design!). But if you need access immediately, there is a workaround:
1. Open the Site Manager (File - Site Manager... or the first toolbar button)
2. Create an entry for that server, enter all details you know, the more precise, the better
3. Open the 'Transfer Settings' tab
4. Tick the 'Limit number of simultaneous connections' checkbox
5. Enter the desired limit into the 'Maximum number of connections' field
Now, if you connect using the Site Manager entry, connections will be limited.
Note: If you limit connections to 1 only, there is a major drawback: You cannot browse the server anymore while a transfer is in progress!
Troubleshooting
Re-registering the shell extension (Windows only)
Especially on Vista or Windows 7 it can happen that Drag&Drop fails and you get an error message stating the shell extension doesn't work. In this case you may need to re-register it. Here's how:1. Open a command prompt as administrator. This is important!
Start Menu - All Programs - Accessories: Right Click 'Command Prompt', select 'Run as administrator'
2. Navigate to the Filezilla program directory.
Example (32bit): cd "\Program Files\Filezilla FTP Client"
Example (64bit): cd "\Program Files (x86)\FileZilla FTP Client"
3. Re-register the shell extension.
Type 'regsvr32 fzshellext.dll' (without quotes of course)
4. If you have 64bit OS, you need to perform an additional step.
Type 'regsvr32 fzshellext_64.dll' (no quotes as well)
If you get the reply 'DllRegisterServer in ... succeeded.', you've done it (though you probably still need to reboot your computer).
Views
Personal tools
- This page was last modified on 29 May 2010, at 11:06.
- This page has been accessed 1,280,995 times.
- Content is available under GNU Free Documentation License 1.2.
- Privacy policy
- About FileZilla Wiki
- Disclaimers

Langganan:
Postingan (Atom)